Tuesday, December 13, 2016

Mount Yong Belar


Gunung Yong Belar, standing 2181 meter located at blue valley, Cameron highland, Perak.

Currently, there are 2 routes used by hikers as a starting point - old route i.e from dam through series of steps, long pipeline walk and river crossing then to the vegetable farm (camp cabin). The journey from starting point to camp cabin estimated around 1 hour or more.


The new shorter route is from masjid Lojing (lojing mosque) thru private land then the farm (camp cabin) via 4WD vehicle (around 30 minutes or less).


I would recommend the shorter route as it will save time and energy – the real deal is at the starting point also known as ‘Pintu Rimba’ (forest gate) – almost 190 meter from camp cabin.

The entrance to mount Yong Belar will begin at Camp Cabin and Pintu Rimba (both around 190 meters apart). The 4WD vehicle will stop here. Then, a short walk through vegetables farm to Pintu Rimba. These area apparently are private owned and no unauthorized vehicle allowed in here. The owner acknowledged that all hikers will trespass his farm for years but only by walking.

The owner had put a little blue signage at the entrance to Pintu Rimba for his 4WD service. The rate is RM40 per person (minimum 10 person) and RM45 per person for less than 10 person for a return journey – 2km away to the main road.

Starting
Made arrangement with Mr Joe (son of the vegetable farm owner) to meet up at BH Petrol blue valley at 7.00am. We parked our car 50 meters from BH Petrol (left side), Mr Joe’s small hut at RM10-00 per car for parking. The 4WD experience will start here – to Lojing Mosque – through a series of muddy and bumpy ride to camp cabin.

 This is Mr Joe's hut and parking area

Our guide - Jebat 

Few reminders here that the ride was not smooth! So be prepared for butt smacking against the  steel floor, splashes of mud water on your clothes and the risk of falling off-road. Just hold on tight!

Camp Cabin
A journey of less than 30 minutes, we reached camp cabin in a cold and misty morning. Upon paying fee for the 4WD service, we set off to Pintu Rimba – around 10 to 15 minutes or so.

Pintu Rimba
Pintu Rimba – it is an open area before we headed deep into the jungle.
From here, vegetable farm can be seen at the valley below – such a wonderful sight.


This is Pintu Rimba

The Plan
From Pintu Rimba, set up camp at Camp Tudung Periuk, travel light to Kem Kasut then to the peak.
Heading down straight to Camp Tudung Periuk and spend the night there.
Taken at one of the opening 


Pintu Rimba to Camp Tudung Periuk
It was up and down endless trail. Less muddy here, manageable contour. 4 to 5 mini peak points with an outstanding view. Distance from Starting point – 2.33km. It took us 1 hour 47 minutes to reach here at 10.19am. Set up our ground and fly sheet. Started our journey back at 11.15am to Camp Kasut.

Safely arrived at Camp Tudung Periuk

At Camp Tudung Periuk

Camp Tudung Periuk to Camp Kasut
Muddy trail! Leg manoeuvre required extensively. Stretching your leg at an imaginable position is unavoidable. Put on water proof glove please.

The distance from start, time taken and time of the day
At Camp Kasut - it was raining

Distance from Starting point – 5.37km. Distance from Camp Tudung Periuk – 3km. Almost 3 hours journey from Camp Tudung Periuk and 5.5 hours from start. Time of the day was 1.59pm.
It was raining since camp tudung periuk. The surrounding area at camp kasut is muddy. It is not suitable for camping, yet there were campers here.

Camp Kasut to Yong Belar summit
Another 900 meters to go according to my Suunto Ambit 2. We continued braving the rain through heavily muddy trail. My shoes was unrecognizable. I’m using Adidas Hydroterra Shandal shoes – it is without fabric and able to disperse water efficiently.
Almost one hour to get here. It’s a little bit tough with all the climbing.


At the top - preparing for instant noodle and hot milo

Summit of Yong Belar
We spent around 30 to 40 minutes here – rest mode on. Its windy and cold. The mist was all around us blocking all the view which was a bit disappointment. Enjoying our Instant noodle and hot milo.

Descending to Camp Kasut and Camp Tudung Periuk
Descending was manageable as there were less energy used compared to ascending. The only thing bothers me was the muddy, slippery trail. Slipped and fall few times. At one point the gravity was pulling me, lost balance and fell. I lost my watch and only realized it after 10 minutes downhill. It took a gigantic effort to climb back again to retrace my step searching that watch. Yup, I found it hiding between the tree branches .

Back at Tudung Periuk
Reached here at 7.16pm, 3 hours from the summit. We wash up at the small river before climbing up to our camp. Its dark and cold. Spending the night here – resting. Brahim’s nut sauce and nasi himpit was our dinner.

Sleeping with Cold Temperature
It was freezing cold at 16 degree celcius. I set up the sleeping bag (bought from Lelong.com for RM65), the ground sheet is the 1st layer, garbage plastic the 2nd layer and fly sheet the 3rd – then the sleeping bag. I wore tshirt, down jacket, glove and socks. But the temperature was just too cold, my body just can’t tolerate the cold and at some point I was shivering. But somehow survived through the night.

Tips :
1) glove in glove – wear glove as base layers
2) socks in socks – wear 2 pieces or more socks
3) beanie/hood
4) Fly sheet/ground sheet – this kind of setting will let the wind in. Either close all possible wind entry or change the setting to covered tent.
5) Based ground for sleeping – either carry mat/yoga mat (bulky) or you can carry simple silver plastic-paper type of material from Daiso or DIY shop at RM5 plus. It can be folded into a thin layer in your bag.

Water Source
There will be 2 points of water source i.e Camp Tudung Periuk and Camp Kasut. It is much more easier at Camp Tudung Periuk with a small river (2 minutes). But not easy at Camp Kasut – around 10 minutes one way to get the water (I heard).

Phone Connectivity
There are some part where you may have sufficient signal. I called Mr Joe from 5th or 4th false peak on our way down from Camp Tudung Periuk to Camp Cabin.

The Trail and Trail Marker
The trail is clear and well marked. As mount Yong Belar is also has connecting pathway to another mountain (V1, V2 – korga, Yong Yap, Tok Nenek, Chamah ulu sepat) there will be different trail upon reaching the summit and only those who experience enough will know about it.

Place to Wash up After the Hike
At Mr Joe’s vegetable farm, there will be toilet facility. You may wash here. But it’s cold water!
Alternatively, you can wash up at the parking lot where you park your car earlier (no toilet).

Place to Eat
Along the road of Masjid Lojing there are more than 3 restaurants serving breakfast and lunch. Not sure about dinner though. For those of you who are craving for tom yam, you may headed to Kedai Kak Yah just opposite Masjid Lojing.

Place to Stay
I would suggest Westwood hotel (please google) few km away from Blue Valley. But the hotel will always full house. Staying at Brinchang town is less recommended as the traffic jam is very bad and will spoil your journey.
Alternatively, you may stay around Ipoh town – 1 hour from Blue Valley/Kampung Raja.

My Sunnto Moves - Trail Route

I'm sharing my moves for convenience : 

click here : Yong Belar Route

The distance from Camp Tudung Periuk to Pintu Rimba - 2.12km, took 1.47 hours 

Another 197 meter to Camp Cabin..just below 


Friday, November 18, 2016

Mount Korbu and Mount Gayong (Korga)


Mount Korbu standing 7162 feet (2183 meter) from sea level. Being the 2nd highest mountain in Malaysia after Mount Tahan. We have another mount Gayong that stretch out a little bit further from Mount Korbu. Standing 7129 feet (2173 meter) from sea level. Around 2.4 km from the summit of Mt Korga. Both mountains located at State of Perak, Malaysia. Climbing these 2 mountains at one go is a must for every hikers to redeem pride and personal glory.

We started our journey as late as 8.30am on a calm Saturday morning. After having our breakfast at nearby Kampung roti canai stall.


The leader a.k.a our guide for this time was ‘Jebat’, a very skilful and experienced hiker (and lightning fast too!). He was kind enough to share tips of do’s and don’ts & what  to expect along the journey.


There were also many group of hikers on that day in view that Mount Korbu is among the popular spot for leisure but serious hikers.


Reminder
1) Hiking Permit – prior approval is needed from local forestry department, normally 2 weeks before
2) Guide – you need a guide to navigate with basic knowledge of hiking, I don’t think its compulsory but highly recommended
3) Hiking with a group – never hike alone! To avoid any unwanted incident such as getting lost or injured

In case of Emergency
Phone Signals will be at the river crossings AND at the location where the building is on top of the hill (from the dam entrance)..as illustrated below  (please click on the photo):


Gear Used
Shoes : Adidas Hydroterra Shandal
Bagpack : Deuter speedlite 20 litre
Attire : normal tshirt and tights
Navigation : Suunto ambit 2 (pre-loaded with Korbu route map from movescount)


My trustworthy adidas

From Start to Water fall
Distance : 3.62km
Time Taken : 2.32 hours
Time of the day  : 11.04am
Time Start : 8.30am
Trail condition : river crossings, dry
Trail difficulty : easy


From Water fall to Kem Seroja
Distance from Water fall : 1.5km
Distance from Start : 5.12km
Time Taken from water fall: 1.05 hours
Time taken from start : 3.36 hours
Time of the day : 12.08pm
Trail condition : dry, hilly
Trail difficulty  : hard


From Kem Seroja to Kem Kijang
Distance from Kem Seroja : 2.5km
Distance from Start : 7.63km
Time taken from Kem Seroja to Kem Kijang : 2 hours 32 minutes
Time taken from Start : 5.53 hours
Time of the day : 2.24pm
Trail condition : dry
Trail difficulty : moderate


From Kem Kijang to Last Water Point
Distance from Kem Kijang : 1.48km
Distance from Start : 9.11km
Time taken from Kem Kijang : 1 hour 36 minutes
Time taken from Start : 7.30 hours
Time of the day : 4.01pm
Trail Condition : dry
Trail difficulty : hard


From Last Water Point to Bukit Botak
No data, forgot to record time. Distance from Last water point to Bukit Botak is 760 meter. We reached here around 5pm plus.
We spent our night here. Temperature here dropped during the night, can’t remember the Celsius but its damn cold! Please beat that cold! – sleeping bag, inner layer with heat technology, down jacket, rain jacket, winter glove and quality socks will greatly enhance the warmth.


The next day, we brought what we need in the bagpack to reduce the weight in our quest to conquer mount Gayong. Travel light will make us faster during climbing. Indeed it was.
We need to climb aluminium stairs countless times (I would say more than 5) as the ascending parts involved a very-very steep sections. Please do exercise caution.

From Bukit Botak to Puncak Korbu – no data, but the distance from Last Water Point to Puncak Korbu is 1.87km with an estimated time of 2 hours 40 minutes. Distance from Mount Korbu summit to Mount Gayong is 2.4km which is around 1.40 hours duration.


The hardest part was from Mount Gayong back to Mount Korbu with an endless uphill journey.
Started from Bukit Botak to Mount Korbu summit then Mount Gayong and back to Bukit Botak again with the assistance from our newly appointed guide, cik Noraini (damn fast too!) as Jebat has been given excused to cook for breakfast.


With a water supply of 1 litre from Bukit Botak to Mount Gayong was not a smart move. We ran out of water upon reaching Mount Gayong. We tried to hold on until we reached back to Mount Korbu. As we were in dire need for water and suffering from exhaustion, we took a short nap at the Korbu summit. Less than 5 minutes, there was this group of hikers just made it to the top.
They were kind enough to supply us at least 500 ml of water and a powder type drink (kukubina with grape flavoured). It was a live saving! To the group, please accept our million thanks for your generosity.


Going down from Mount Korbu to Bukit Botak was easy. But becareful though. The steep section and the stairs.
We reached Bukit botak around 11.00am. Having our breakfast like there was no tomorrow. Around 1.00pm, we headed down. Descending was my favourite part where we can speed up as we have only 20 litre of back pack. We reached Last water point in 22 minutes.

It's hot!

Descending Journey

Bukit Botak to Last water point
Distance : 760 meter
Time taken : 22 minutes
Time of the day : 1.23pm


Last water Point to Kem Kijang
Time of the day : 2.06pm
Time taken from Bukit Botak : 1 hour 4 minutes
Time taken from Last Water point ; 43 minutes


Kem Kijang to Kem Seroja
Time of the day : 2.56pm
Time taken from Bukit Botak : 1 hour 55 minutes
Time taken from Kem Kijang : 50 minutes


Kem Seroja to Waterfall
Time of the day : 3.41pm
Time taken from Bukit Botak : 2 hours 41 minutes
Time taken from Kem Seroja : 36 minutes


Water fall to Car park
Time of the day : 5.22pm
Time taken from waterfall : 1 hour 41 minutes
Time taken from Bukit Botak : 4 hours 20 minutes


There you have it, a total of 4 hours 20 minutes from Bukit Botak back to car park.

It was tough but very rewarding. 

Few reminders for those who wish to hike Mount Korga :

1) Fitness level - please, please train months before actual day to improve your fitness. You don't want to cause delay for the whole team. Don't think that it is ok if you're unfit as others will wait for you.

2) Sleeping Attire - winter glove, jacket, down jacket, layers of cloth, socks, beanie will make your sleeping more comfortably. You might get hypothermia even at Bukit Botak without warmth.

3) Navigation Matters - hike with someone experienced enough - who could find their ways thru the jungle or Navigation device such as Suunto ambit 2 (like mine).

4) Phone Signal Spots - remember those areas marked with stars above where the phone signal is strong enough to make a call in case of emergency.

Wish you good luck.

Saturday, October 22, 2016

EXORA - LAMPU CVT MENYALA


Continuously Variable Transmission atau CVT adalah sejenis sistem gear tansmisi automatik dalam industri automotif. Proton Exora Bold menggunakan sistem CVT.
Kalau dulu kereta-kereta automatik kat Malaysia ni bila jalan dia ada 'jerk' sikit menandakan pertukaran gear secara automatik dari satu step ke step yang lain.
CVT gear automatik di exora ni dia senyap, jerk tu tak rasa pun dan telah banyak jenis-jenis transmisi automatik yang lebih moden seiring dengan teknologi canggih di gunakan pada kereta-kereta lain.

Keadaan Exora Penulis - CVT Menyala

Lampu CVT pada exora bold saya kejap menyala, kejap tak. Kadang-kadang seminggu sekali dua, kadang-kadang sebulan sekali. Bila off on kan enjin dia ok je.
Pegi bengkel dia cakap tak dapat detect apa punca. Tak salahkan bengkel jugak, symptom takde, solution pun susah nak buat, takut tukar barang still under warranty, kalau salah barang, buat penat diorang je.

Keadaan Bila CVT Menyala

Bila lampu CVT ni menyala (rujuk gambar di atas - lampu bulat, ada gigi-gigi tu), gear berada dalam keadaan neutral (free) secara involuntary (secara paksa), ini di tunjukkan pada bahagian position gear di speedo meter - gambar [-].
Bila keadaan ini berlaku tidak kira enjin sedang hidup, kereta sedang bergerak di jalanraya atau tidak, ia akan menyebabkan kereta kehilangan fungsi bergerak apabila pedal minyak di tekan. Menunjukkan gear macam tak masuk. Enjin akan mengaum dan rpm akan melonjak naik seiring dengan tekanan pedal minyak tersebut.

Apa Perlu Anda Lakukan?

Berdasarkan pengalaman saya yang mengalami keadaan ini, di sini saya ingin berkongsi tentang bagaimana untuk menghadapi keadaan di saat-saat memerlukan : 

Bila keadaan CVT menyala bila kereta tidak bergerak - free kan gear, off kan enjin dan cuba start semula, angkat handbrake, tekan pedal brake (supaya kereta tidak bergerak) dan cuba masukkan gear pada D dan perhatikan signal pertukaran gear pada speedo meter di dashboard. Jika ada lambang D, maksudnya kereta dah ok, tetapi biarkan sekejap, jika masih di D, boleh teruskan perjalanan.

Senario Kebarangkalian lain - bila dah masuk D, tapi gear tu bertukar semula pada [-]. Ulang langkah di atas, kali ni biarkan enjin mati lama sikit.


Bila Keadaan CVT menyala apabila kereta sedang bergerak - ulang langkah di atas (offkan enjin dan start balik) tetapi perlu di ingatkan bahawa apabila kereta sedang berjalan kita terdedah pada bahaya, iaitu power steering akan kehilangan kuasa penuh, jadi anda perlu berhati-hati dan tumpukan perhatian pada arah panduan dahulu sebelum off dan start kereta balik. Sebaiknya berhenti di tepi jalan (kalau tengah-tengah jem tu takpe).

Senario Kebarangkalian lain - dah off on enjin tapi masih tak boleh jalan jugak (gear tak masuk ke D). Cuba banyak kali jangan putus asa.

Ada satu-satu ketika, keadaan CVT menyala telah terjadi sepanjang perjalanan lebih 20 kali pada satu-satu masa.

Repair Kereta Anda - Ye ke?

Di nasihatkan supaya kereta itu di hantar ke pusat servis proton untuk di analisa. Berdasarkan pengalaman saya, bila sampai bengkel, dia tak jadi pulak (lampu CVT tak menyala). Tetapi untuk mengelakkan kesukaran di masa hadapan, kena hadap jugak kat bengkel.
Dia akan pasang satu alat diagnos enjin kereta anda. Tapi biasanya kalau lampu CVT tu tak menyala, mekanik tu tak boleh detect (kesan) apa masalahnya.
Saya dah pergi dekat nak 10 kali ke bengkel tanpa ada sebarang solusi. Sehingga di nasihatkan bawa ke Glenmarie di mana tempat kereta-kereta bermasalah bergabung.
Cuma saya malas nak pegi di sebabkan jauh, sibuk bekerja, penat nak tunggu (mau sehari tu, takpun kena tinggalkan kereta - mau patah kaki!).


Repair Kereta Anda - Final

Selepas setahun lebih pakai, meter pun dah 85,000 km, masalah CVT menyala ni makin kerap. Sampai naik fed-up. Pegi ke bengkel, baru lah dapat detect - di mana "POSITION SWITCH" perlu di ganti.
Kesimpulannya bila position switch tu dah teruk rosak baru boleh detect. Bengkel bagitau yang spare part tu perlukan 3 hari untuk sampai. Buat sementara tu, kena hadap dulu keta tak boleh gerak tengah jalan tu.
Jangan tunggu bengkel tu call kalau barang sampai, di nasihatkan call je bengkel tu bila dah ngam-ngam 3 hari, senang cerita. 
Pertukaran spare part dan testing mengambil masa beberapa jam. Nasib baik office dekat, tinggal keta pagi, ambik petang. 
Bila dah tukar, dia bagi kita test beberapa hari dulu, kalau ok baru dia bukak jobsheet mengatakan keta dah ok.
Kesimpulan no dua pulak, tak payah nak pegi Glenmarie jauh-jauh, beratur, kena ambik cuti, sangap menunggu.
Nasib baik kereta masih dalam warranty, kalau tak memang mahal harga nak tukar tu...

Update May 2019

Boleh refer dekat satu FB posting dari Lewe Rezz dekat FB Proton CFE & CVT Technical discussion satu ketika dulu pasal cvt punya problem dan position switch adalah puncanya. Kos barang dalam RM660 belum upah pasang. Position switch ni adalah alat berkaitan dengan penukaran gear, mengikut posting beliau. Terima kasih kerana share informasi ni bro....;


Di harap dapat membantu pengguna-pengguna exora di luar sana.

Tuesday, April 26, 2016

Gunung Semangkuk, Fraser Hill - Daypack Make Easy

Welcome to Gunung Semangkuk

Gunung Semangkuk located in Fraser Hill, Pahang with an altitude of 1824 meter. Journey of conquering Gunung Semangkuk (or ‘Semangko’) will start from Pine Tree Hill and Twin Peak. We can say that every hikers who succeeded climbing Gunung Semangkuk are often reward themselves with pride as they also conquered two more mountains i.e Pine Tree Hill and Twin Peak at one go.

You may park your car along narrow road of The Pine Tree Hill arch or further up a bit there's a very small area for carpark, but do note to park your car properly and do not block any entrance.

Though the altitude of Gunung Semangkok is 1,824 meter, the starting point via Pine Tree Hill is already at the height of 1,320 meter. As such, we just need to climb another 500 meter elevation only, that will at least lift our spirit up.


taken from my Suunto Movescount 

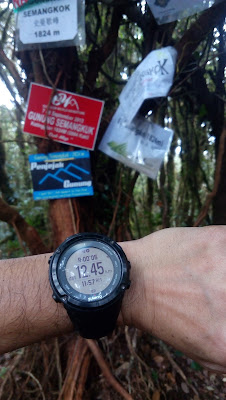
The distance may vary according to existing record, blog and maps taken from the internet which within the range from 11km to 15km one way. In my case, the distance is 12.45km (suunto ambit 2) one way, that makes almost 25km return. You may find the gpx route here :  suunto movescount gpx file (view as mapbox, then copy route).

See? 12.45km....distance

Though my distance recorded 12.45km one way, when I export the track to routeplanner, the distance became 12km, short of 450 meter. What is 450 meter means to us? Almost a half kilometer climbing which will took hours to complete and add up to the total duration time. 450 meter is equal to 10 km for me...arrgh..!


Upper left - 12km instead of 12.45km...huhu
Each of the flag represent the mark. From right - Twin peak, water point, sungai merah, and Semangkuk Peak (what is missing here is the Helipad... unaware that I had passed this section...demmit!).

Searching thru suunto movescount, there were few Gunung Semangkuk map readily available and I need to go pass through Pine Tree, Twin Peak, Water point, Sungai Merah, Helipad and finally Semangkuk Peak.

However, there was no distance or location from Twin Peak to Water Point, Water Point to Sungai Merah and so on. It was quite difficult for me to measure the time taken and elevation – thus editing the map in suunto movescount for Water point, Sungai Merah and Helipad were just based on estimation.

I would advised using GPS navigation device which will assist you in estimating the remaining distance and Navigate using the correct path preventing from getting lost. My suunto ambit 2, pre-loaded with Gunung Semangkuk route proven to be successful.

Starting Point Gps coordinate  : 3.711805, 101.727518


A Brief Summary of Hike

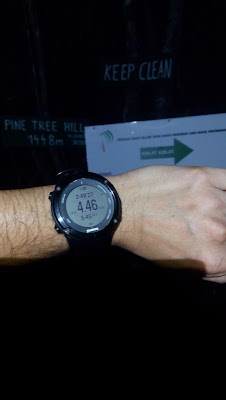
  • Started from Pine Tree trail head at 3.00am towards Pine Tree peak seems easy. Dry Trail
  • From Pine Tree Hill to Twin Peak, short distance only, piece of cake.
  • Twin Peak to Water point – mostly downhill, a little bit technical but manageable
  • Water Point to Sungai Merah – moderate, starting to get tired
  • Sungai Merah to Helipad – hard! Its a long and high altitude climbing
  • Helipad to Semangkuk Peak – Hard! Endless twist and turn
In summary, distance from Start to Peak – 12.45km. Time Taken – 9 hours : 


Gear Used : no specific gear, except good trail shoes – Adidas hydroterra Shandal
                     Head Lamp – Fenix, blinkers and additional light with extra battery

Navigation : Suunto Ambit 2

Food           : apple, chocolate bar, buns, gardenia toastem

Drinks        : plain water 2 liter, Ribena 500ml, coke 500ml (refill at Sungai Merah campsite, using                           sawyer water filter).

Advice for Daypack

  1. Need to be physically and mentally fit for this climb. First, you need to overcome fear walking at night (starting and ending). The distance is 12km one way is not an easy climb.
  2. Bring basic hiking gear though you may not use it but essential to have – ground & fly sheet, rain jacket, first aid kit, lighter, power bank, extra battery, water filter, glove.
  3. Bring food for extra one day – just in case
Caution

1) Poisonous creatures – snakes, scorpion, centipede (No snake but but the other two were present)
2) Sting creatures – bee, ants (there were hiker get stung by bee)
3) Nature’s wrath – heavy rain, slippery trail, loose grounds, lightning (it was raining in the evening)
4) Flora of torture – thorny and tiny leaves that hooked (my cap torn by these)
5) Creepy Sounds – nocturnal beings (gives you the jitters, but just ignore them)

Trail Matters

Hikers may get confused on the trail especially from Helipad to Semangkuk Peak. It seems that after helipad, the trail will make you to go down, but you may think that it could not possibly be because the trail is supposed to be only upward from Sungai Merah to Peak. Don’t worry, just follow the ribbons/marker on the trees.

Hikers may also feel that they have been following the same sections, trails and making unnecessary U-turn as they all are look-alike & seems that you have been there before but it is just a delusions from a tiring mind and body. Believe me, the trail is correct.


Pine Tree Hill. Yay! Easy...

Twin Peak...piece of cake.
Almost sunrise...but the view blocked by fog.
Can someone change the signboard with a proper one?

This is the water point...1.55km from Twin Peak.
I think the water source is nearby.
Please turn left for Gunung Semangkuk ya.

There you go. 6.81km from Start, we have been walking, climbing for 4.51 hours and the time was 7.48am 


The direction to Gunung Semangkuk is properly assigned.
Kem Sungai Merah is next


Kem Sungai Merah. 8.66km from start. 5.38 hours. 


 The surrounding. 
Sungai Merah is an ample space campsite. Most hikers will overnight here and making their way up the next morning.


The water source i.e small river is located behind the tree with signboard. We can hear the stream flowing.


Refill your water here. 30 meter from the campsite signboard. The water is refreshing!


This is the remaining distance that we have to endure before reaching the peak, between Sungai Merah and Semangkuk Peak. It showed 1.95km to go. 


Responsible hiker. I found this yellowish rope on the track. I tight it to this tree for the benefit of other hiker. 


 after hours of hike, it was only 176 meters distance remaining to the peak. 
Please focus on the triangle thingy on the watch, its a direction you need to follow, well mostly it is correct. 


 Yay! made it! After 9 grueling hours, 12.45km.


If it wasn't for you, the red tree sticker, I may have lost confidence  


same photo again at the peak. 
same cap, same tshirt, same tights, same shoes from other hike.


Around 1.30pm or so, it rain heavily. I couldn't take photo at helipad and sungai merah on the way down. What a big disappointment!


The rain stopped. Water point on the way back 


Twin Peak again. at 5.06pm, its getting dark 


Finally, we reach the starting point and ended the extreme hike in 16.5 hours.

There you go, Climbing Gunung Semangkuk Daypack. It's tough, hard and tiring. So, just be prepared.